Before you begin to calibrate a sprayer, check it carefully to be sure that all components are in good working condition.
To prepare sprayers:
- Remove nozzles and screens and clean them in soapy water with a soft brush. Remove any deposits from the nozzle opening with a toothpick or compressed air. (Never use a knife or metallic object to clean nozzles. It will ruin them.) Never try to unclog a nozzle by blowing through it with your mouth.
- In a place away from any wells or water supplies, rinse the spray tank thoroughly and partially fill it with clean water.
- Pressurize the sprayer and flush hoses and boom with plenty of water.
- Reinstall nozzles. For boom sprayers with multiple nozzles, make sure that all nozzles are the same size and type. Choose the right nozzle size, type, and alignment for your application needs (see Nozzle Tip Selection).
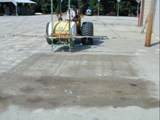 Pressurize the sprayer and check nozzles for uniform output by spraying water on the pavement and watching for streaks as the spray dries. Wet streaks directly under the nozzles may result from damaged or worn nozzle tips, low operating pressure, or low boom height. Wet streaks between nozzles may result from incorrect alignment or boom height. Clogged nozzles may produce streaks anywhere in the spray pattern of the bad nozzle. Replace any nozzle producing heavy or light streaks and recheck for an even pattern.
- Check all hoses, fittings, and the pump for leaks.
- Check all pressure gauges. If a gauge is rusty or of questionable accuracy, replace it.
- If you are using a sprayer with multiple nozzles on a boom, follow the steps below to be sure that all the nozzles are releasing nearly equal amounts of spray solution (use water for this procedure):
Find a container marked in ounces. With the sprayer operating at the desired pressure, catch the output from each nozzle for 30 seconds and write down the number of ounces from each nozzle.
After catching the spray from each nozzle individually, add the amounts caught and divide by the number of nozzles to get the average output per nozzle.
If the output from any nozzle is more than 10 percent above or below the average, clean or replace that nozzle.
Recheck the output from all nozzles. Use the new output to figure a new average. Make appropriate nozzle changes, if necessary.
Example of Nozzle Output Before you begin to calibrate a sprayer, check it carefully to be sure that all components are in good working condition.
| Nozzle | Output Test #1
(Ounces after 30 seconds) |
Output Test #2
(Ounces after 30 seconds) |
| 1 | 25 | 25 |
| 2 | 20 | 24 |
| 3 | 24 | 25 |
| 4 | 23 | 25 |
| 5 | 25 | 24 |
| 6 | 24 | 26 |
| 7 | 23 | 25 |
| 8 | 28 | 26 |
| Total | 192 ounces
divided by 8 nozzles |
200 ounces
divided by 8 nozzles |
| Average | = 24 ounces | = 25 ounces |
Output Test #1, average: 24 ounces
10% of 24 (0.10 × 24 ) = 2.4
The acceptable range for output is 21.6 to 26.4 ounces (24 ± 2.4).
In this case nozzle, 2 and nozzle 8 should be checked, cleaned, or replaced. When the output is too high, the nozzle is probably worn out and should be replaced. When the output is too low, the nozzle may be clogged, and cleaning may bring it into the correct range.
Output Test #2, average: 25 ounces
10% of 25 (0.10 × 25) = 2.5.
Acceptable range is 22.5 to 27.5 ounces (25 ± 2.5).
All nozzles now fall within the acceptable range.